Follow the step by step instructions below or watch our how to video.
Before connecting your TV Streamer to the TV, you will need to power the TV Streamer using the USB Power Cable provided.
1. Power your TV Streamer
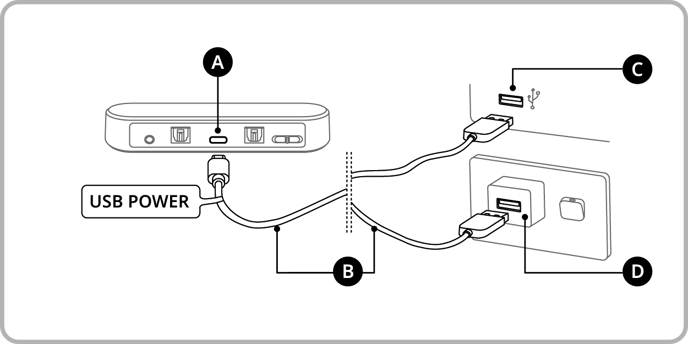
Legend
A: Power (TV Streamer)
B: USB Power Cable
C: USB Port (TV)
D: USB Wall Charger
- The TV Streamer is powered by the USB Power Cable provided.
- Connect the USB-C end (smaller tip) into the back of the TV Streamer.
- Connect the USB-A end (bigger tip) into your TV OR a USB wall charger.
Note: USB wall charger is not provided.
2. Connect your TV Streamer to your TV
There are three options depending on your TV audio output. Click the option that's right for you and follow the instructions below to connect to your TV.

|
Option AFor TVs with Digital Optical Audio Output. Most modern TVs will require this option. |

|
Option BFor TVs with 3.5mm Headphone Audio Output. Select this option if your TV doesn't have a Digital Optical Audio Output. |
 |
Option CFor TVs with RCA Audio Output (red/white ports) |
Option A – TV with Digital Optical Audio Output
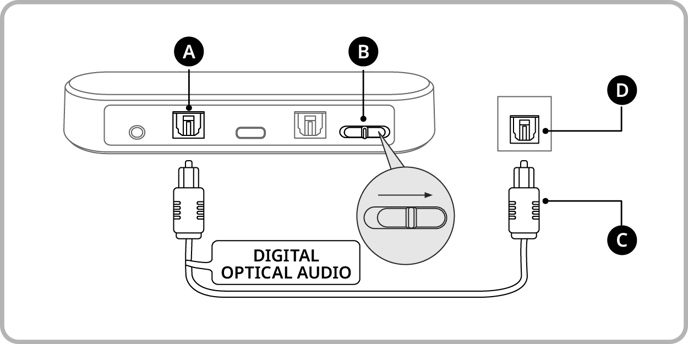
Legend
A: Digital In (TV Streamer)
B: Audio Input Switch (TV Streamer)
C: Digital Optical Audio Cable
D: Digital Optical Output (TV)
- Connect the TV Streamer to the TV with the provided Digital Optical Audio cable.
- Remove plastic caps on both ends of the cable.
- Plug one end of the cable into the TV Streamer at Digital In, and the other end into the Digital Optical Output of your TV.
- Select Digital as the Audio Input option on the TV Streamer.
- Slide the Audio Input Switch to the right to select Digital.
- Ensure PCM is selected in your TV audio settings.
- Open the Settings Menu on your TV.
- Select Sound Settings, then select either:
Additional Settings / Advanced Settings / Expert Settings / SPDIF Settings
Please note, every TV is different - the appearance and language of the settings menu may vary slightly depending on your TV. - Select either:
Digital Sound Output / Audio Format.
Please note, HDMI Audio Format is not the same as Audio Format. - Select PCM.
Option B – TV with 3.5mm Headphone Audio Output
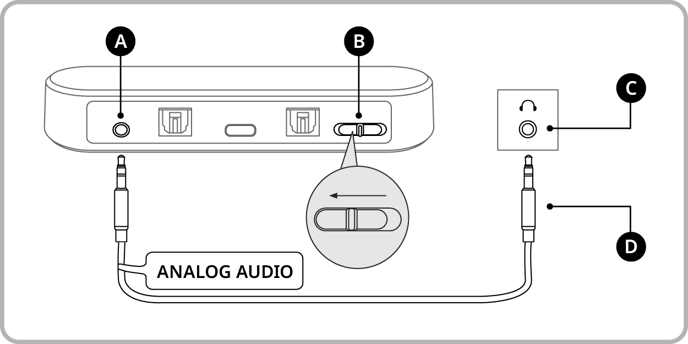
Legend
A: Analog In (TV Streamer)
B: Audio Input Switch (TV Streamer)
C: Analog Audio Cable
D: Headphone Audio Output (TV)
- Connect the TV Streamer to the TV with the provided Analog Audio cable.
- Plug one end of the cable into the TV Streamer at Analog In, and the other end into the Headphone Audio Output of your TV.
- Select Analog as the Audio Input option on the TV Streamer.
- Slide the Audio Input Switch to the left to select Analog.
Option C – TV with RCA Audio Output (red/white ports)
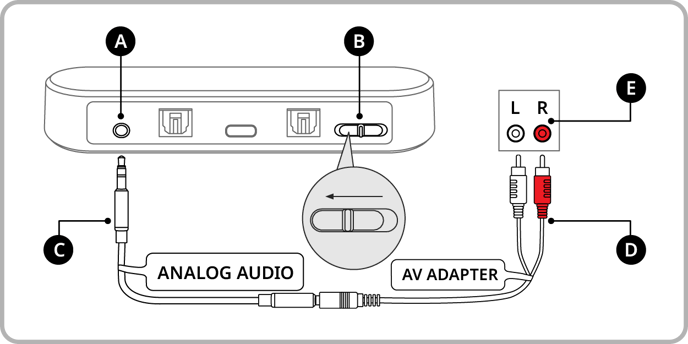
Legend
A: Analog In (TV Streamer)
B: Audio Input Switch (TV Streamer)
C: Analog Audio Cable
D: AV Adapter Cable
E: RCA Audio Output ports (TV)
- Connect the TV Streamer to the TV with the provided Analog Audio and AV Adapter cables.
- Plug on end of the Analog Audio cable in the TV Streamer at Analog In, and connect the other end to the AV Adapter.
- Plug the other ends of the AV Adapter into the matching red/white RCA Audio Output ports in your TV.
- Select Analog as the Audio Input option on the TV Streamer.